Visitors

Saturday, July 13, 2013

Chandelier Makeover


I have always wanted a chandelier. I think they are a fun and gorgeous way to light a room. I have personally never had one before. My house, growing up, was never the type of house to have fancy things. We had nice things, mostly hand-me-downs and inexpensive yard sale finds(my favorite), but never anything shiny and bright. I love the way my parent's house looks. It is rustic, country, comfy and cozy. It is filled with all of their favorite things which makes it perfect for them. I love the simplicity of it so I have decided to go for the same look in my home. I don't think I ever consciously made that decision, I just started filling my house with the things I love and it has just evolved into the same type of space. It's also very comforting creating a sanctuary like this that reminds me so much of my life growing up since I rarely get to see my family. I feel closer to home being surrounded by these things. I know money doesn't buy happiness, and I am a firm, firm believer in that, but these materialistic things really do make me extremely happy! One of the huge reasons I love my things so much is because more and more of them are things that I have made or redone to be exactly the way I want them.

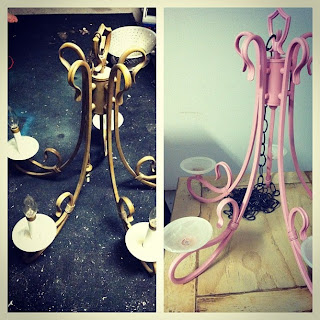
This Chandelier is one of those special projects. I was lucky enough to get the chandelier for FREE! It was brass and had electrical hook ups. The wiring was questionable, and we rent our home so hooking up a chandelier to the ceiling light was more work than we wanted to deal with so we converted it to a candle chandelier. I definitely prefer this look to the lightbulbs.

My husband first removed all wiring and bulbs. I started by washing and spray painting it pink. I actually had a lot of spray cans of light pink that I was going to use for another project that I never started. I was honestly very hesitant to paint it pink. I had other ideas...light yellow or green, or even trying a different metallic color. I only chose the pink because those cans were staring me in the face and I had to try it. (If you don't like it, you can always repaint it!) To my surprise I fell in love with the color and it works for my kitchen perfectly. After the paint dried I placed the glass pieces back on and glued them with hot glue. I also filled in any hollow areas inside the glass with the hot glue. This created a foundation for the tea light candles. We purchased a decorative chain from Lowes for about $5. The total for the project came to a total of $10 once I purchased the candles because I already had the paint.


The chandelier creates a nice focal point in my dining area. I never really enjoyed being in my kitchen before. It has a tile countertop that I hate. You would be amazed at how much I dislike my kitchen just because of that tile. Now I love it! 

I may not have a shiny sparkling home full of jewels, crystal, and gold, but I love my country accents. Now I have a beautiful chandelier that works perfectly with my rustic decor.

(Overhead view)


(the awful, awful tile countertop-and note the rose artwork 
on the far wall. The pink in the drawings are brought out with the pink chandelier.)
(another view)


Besides the pink chandelier I also have a few other DIY pieces in my dining area. The large farmhouse table was made by my husband and dad. I kept pinning many different farmhouse table tutorials on pinterest in hopes that one day someone would make me one. My dad was visiting last month (June) and I showed him a picture on my computer and told him he could make me one for his father's day gift "if he wanted to"(with a huge grin on my face). My sweet dad spent all of father's day making me this table. I am the luckiest girl on earth!


This photo shows the brilliant color and structure of it better than the other photos. I plan to take some more photos in the morning in the natural sunlight to show off the whole kitchen together.

Along with the table we found 6 folding metal chairs and painted them. I love that they are a totally different material than the table. We were able to find three folding chairs at the Salvation Army for $2 each. The other three we purchased for $10 each brand new. After buying paint the chairs cost less than $50. 

My kitchen is finally becoming a place I love. Now it's time to tackle the living room!

Happy DIYing!


After two months

I have been working really hard on getting in better shape and health. I did so well every day without fail for about two months. I was so proud of my progress. I felt so much better. I lost about 6 inches off my waist and was down at least 15 lbs. Since then my parents visited and I have not been doing so well. I don't want to blame it on them, I just got into the "vacation" mode and have fallen off the health train hard! :( I am working on getting things going in the right direction, but it has been difficult. I gained a little weight back and don't feel as good because I allowed myself to have pop. That stuff is evil! There is nothing good about it! I am slowly getting off of it so I don't have horrible caffeine headaches. I did well doing that last time so I hope that it works this time.

I know right now I may not be the best person to give fitness or health advice, but I will tell you what I know and did because it did work for me and I plan to get right back to where I was before.

I started out in small steps. I didn't do it all at once because that just gets too overwhelming. With small steps I eventually began eating clean, I cut out pop altogether (I actually just drank water-no lemonade, sugary tea-nothing!), and I worked out daily (taking sundays off for rest).

This routine became so addictive! It was so fun to see how my health improved and body changed for the better.

I went from not being able to walk this past March to jogging while out on a family walk. It was AMAZING! I also didn't have any more stomach pains and my pre-diabetes improved greatly. I used to be the type to gain and gain and never notice until I tried to fit into a pair of pants that fit me a couple laundry cycles ago! Now I have surprising results when it comes to trying on clothes. I love the shock of clothes being loose than them being tight or worse-so tight they don't fasten! Yuck!

So all it takes is a little-no a lot of hard work! It is so worth it though!

Here is a picture of me that shows the progress I did make in those short two months. The left is back at the end of March and the one on the right is the beginning of June(a little over two months). I see an incredible difference. I can't wait to see what results I will get next!


This is a quote that always keeps me going when I have set backs. It speaks the truth when you feel like you are making no progress towards your goals.

Good luck on your health journey!


Thursday, July 4, 2013

Rhubarb Plum Cream Cheese Pie


This recipe was created by tweaking a few things from one of my favorite recipes. I have had the recipe for years. I got it online probably 6 or 7 years ago and I can not find it anywhere. If you know who is to credit for this lovely recipe please do tell! Here is a link to the other post with that recipe.

I will go ahead and type it out again to keep you from clicking around. 
I will also include my version of this pie to incorporate the plums. A good friend of mine, who is also a military spouse, is lucky enough to live close to her parents. Her father has a plum tree and she gave me a huge basket full of delicious fresh (no pesticide) plums! I couldn't resist using them in some way in this recipe. Their color is beautiful and I just knew the taste would do very well with the cream cheese.

Here is the original recipe:


Rhubarb Cream Cheese Pie

3 cups rhubarb or 1 pkg. (chopped)
1/2 cup sugar
unbaked pie shell
2 eggs
8 oz. cream cheese
1/2 cup sugar

In a bowl combine rhubarb and 1/2 cup sugar. Fill pie shell with mixture and bake at 425 degrees for 15 minutes. Remove pie and readjust oven to 350 degrees. In a separate bowl, combine 2 eggs, 1 pkg. cream cheese and 1/2 cup sugar. Pour over rhubarb mixture and bake at 350 degrees for 30 minutes.

Topping:
1 cup sour cream
1 teaspoon vanilla
1/2 cup sugar

To make topping mix all ingredients together and pour over hot pie. Spread to edges of pie crust without dripping over. Refrigerate for at least 1 hour.


Rhubarb Plum Cream Cheese Pie

1 cup rhubarb (chopped)
2 cups plums (pitted and sliced-keep the peels on)
2 Tablespoons minute tapioca 
1/2 cup sugar
unbaked pie shell
2 eggs
8 oz. cream cheese
1/2 cup sugar

In a bowl combine rhubarb, plums, tapioca and 1/2 cup sugar mixture. Fill pie shell with mixture and bake at 425 degrees for 15 minutes. Remove pie and readjust oven to 350 degrees. In a separate bowl, combine 2 eggs, 1 pkg. cream cheese and 1/2 cup sugar. Pour over rhubarb mixture and bake at 350 degrees for 30 minutes.

Topping:
1 cup sour cream
1 teaspoon vanilla
1/2 cup sugar

To make topping mix all ingredients together and pour over hot pie. Spread to edges of pie crust without dripping over. Refrigerate for at least 1 hour.

I would refrigerate even longer. After one hour it is chilled and delicious, but I find that 3+ hours is even better.

(adding fruit and sugar mixtures to pie shells)

(pouring egg mixture over fruit)

(Sour cream topping added)

(this is the plum version after being chilled)

DELICIOUS!!