Visitors

Sunday, December 1, 2013

Book Review: Maya-Bay of the Dolphin

My book reviews are my personal opinion. I am not paid for reviews. I read and write reviews for fun. Some books are given to me, some are won in giveaways and some are purchased. All reviews are my full honest opinion and it is not in any way for or against a specific author. Thank you!

I love reading. It has always been a very important part of my life. Was I always good at it? Definitely not, no one is. We all start out not knowing how to read. I, however, struggled more than the average person.

For most of elementary school I was put into a remedial reading group. We met during reading time each day. I really enjoyed the attention I got in that small group. It really helped me to succeed in school. I averaged a "C" all 6 years I was there, and I believe that was mostly for effort. Not being a great reader affected all areas of work.

Eventually, thanks to the help I received from teacher aides, I caught up and surpassed the majority of students in my grade. By the time I got to middle school (6th grade) I was getting all A's, on academic teams and the spell bowl team. Not to mention I was reading for fun.

It has opened my eyes to how very important reading is in all aspects of your life. I may not be an English Major or an editor of a big newspaper, but reading has been a blessing and a form of happiness for me.

Nowadays I read for fun. I paid my dues. I read all of those high school and college textbooks...let's put an emphasis on all of the Nursing material I had to read... I enjoy reading for fun now. I have read more in the last two years than I have my whole life (pertaining to reading for enjoyment.) I have read and enjoyed many different types of books. I also still really enjoy children's books. My kids are now reading and one of my favorite things to do with them is visit the bookstore. We go once or twice a week. I love it!

I just recently finished a book written by a local author, Suzanne De Board. I was lucky enough to meet  her and her husband over Thanksgiving break during a book signing. She had 7 books available for purchase, and of course I couldn't walk out of there with just one book--so I got three! The three I chose were: Sarah Jane, The Gift (the first book in "The Gift" series, and Maya-Bay of the Dolphin.  Maya-Bay of the Dolphin is a middle-school reading level chapter book. I read it the day after I bought it. I couldn't wait to dive into one of the books I got so I decided to start with the one I could finish quickly. I was not disappointed!

I am not a professional book reviewer, but I will give my opinion. I give reviews for almost all the books I read on my Goodreads app, but this is the first one I have written a blog post about. I believe this book is good enough to get more recognition so I would be happy to spread the word in any way I can.


I must begin with the cover illustration since that is the first thing you see. It is beautiful. I love the bright, cheerful colors. I will tell you all like I told the author, "I try not to judge a book by its cover, but I can't help it. These are beautiful." ("these" referring to all of her books.)

Her books really do have some of the best cover art I have ever seen.

Now onto the inside...

This was such a cute story. It is the story of seven year old Maya who loses her nana, her best friend. The family spreads her cremated ashes out to sea, and Maya spots a dolphin who she believes is her papa taking her nana with him.

The story continues with her parents struggle to make her believe she is not seeing her grandparents and that it is only marine animals.

The whole story is wonderful, but the ending is perfect. It put a smile on my face and brought a tear to my eye. I can't wait to read it with my kids.

It is very well written. I feel like it is a treasure for all ages, but especially the youngest readers. Books for young audiences are very much Straight to the point without much imagery or description for fear that the young reader can't understand the concept of the story. This story is quite the opposite. The author really delivers the scene and story simplistically and eloquently. 


I highly recommend this book. I love a book with a pleasant surprise ending and it isn't too often you find that in a book written for young readers. Which is why this book is for people of all ages. Christmas is coming near and you still have time to order things online. Give your children the gift of reading and start with this book! :) Here is a link to the book on Amazon.


Happy Reading!

Friday, November 22, 2013

Honoring Our Veterans

I know a lot of my posts are centered around my weight loss journey or crafting in some way. I love sharing my crochet patterns, pinterest fails, or recipes, etc., but today I thought I would change things up a bit.


In honor of Veterans Day being this month I was asked to share a link to an article about PTSD-Post Traumatic Stress Disorder. "Posttraumatic stress disorder (PTSD), once called shell shock or battle fatigue syndrome, is a serious condition that can develop after a person has experienced or witnessed a 
traumatic or terrifying event in which serious physical harm occurred or was threatened," -WebMD. 

This blog post by The American Recall Center offers some important information on the topic.
Caring For Our Heroes: Learn About PTSD This Veterans Day

"The American Recall Center provides drug and medical device recall information alongside practical healthcare information and support. We aim to build the most comprehensive resource on the Internet for timely and trusted material regarding healthcare topics that matter to the consumer. The team at ARC is dedicated to helping consumers find accurate information with ease," -The American Recall Center (About Us).

Although this post is coming around Veterans day, and although most of us associate PTSD with military members who have seen combat, PTSD can occur in any person who has experienced a traumatic event. Unless you or someone close to you has experienced this condition, you probably haven't really thought about it too much. PTSD can be very debilitating and those who have it have a lot of obstacles to overcome. Let's take this time to educate ourselves a little more so that we may show support for those who have it.

Also in the article offered by The Recall Center are further resources that could be beneficial to those experiencing PTSD.

To those veterans who have served and fought for everything we have and stand for today, I thank you.


Sunday, November 3, 2013

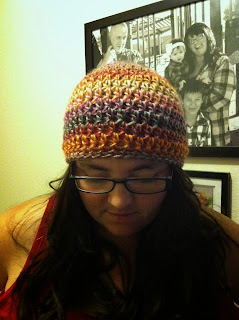
Large Hook Beanie Hat

Large Hook Beanie Hat


Pattern by: Kayla Anderson

size=adult
hook size=M
worsted weight yarn

I used red heart boutique treasure

Gauge: 8 hdc = 4 inches
7 rows= 4 inches

Make a magic ring.
6sc in ring.
Do not join...you will work in the round continuously.
2hdc in each sc around.
Place marker.
Next round: *(2hdc, 1hdc) Repeat* to end of round.
Next round: *(2hdc, 1hdc, 1hdc) Repeat * to end of round.
Next round: *(2hdc, 1hdc, 1hdc, 1hdc) Repeat * to end of round.
Next round: *(2hdc, 1hdc, 1hdc, 1hdc, 1hdc) Repeat * to end of round.
Next round: *(2hdc, 1hdc, 1hdc, 1hdc, 1hdc, 1hdc) Repeat * to end of round.
Next round: 1hdc in each st around.
Repeat this round until hat measures about 7in.
Next two rounds: 1sc in each stitch around.
Finish the hat by placing 1 sl st in the next two stitches. This will create a more even look since this hat was not joined together in each round.
Tie off and weave in ends.


If you have any questions you can email me at 
Kayla1986mc@hotmail.com 


Friday, October 25, 2013

Buttons & Stripes coffee cosy


Pattern by: Kayla Anderson

Materials
worsted weight yarn (striping)
two buttons
I-9 hook


Ch 25
Sc across starting at 2nd ch from hook.
Row 2:  Ch 1 turn sc across.
Row 3:  ch 2, turn, hdc across.
Repeat rows 2 & 3 two times.
ch 1 turn. Sc across next row, 2sc into last stitch.
Do not turn.
Continue sc all the way around putting 2sc in the remaining corners. (when creating the sc on the sides where no previous stitches exist, be sure to create 10 sc on each side-do not put 2 sc into the last corner you stop at.)
Ch 2 at the ending corner, 1hdc in same space where you started your ch 2, then hdc 6 down the side. Ch2 turn and hdc back across same side.
Ch 1 turn, sc in next two stitches, ch 2 sk 2 stitches, sc in next two stitches, ch 2 sk 2 stitches, sc in last two stitches. (Ch 2 spaces are button holes).
Ch2 turn and hdc back across.
Finish off and weave in ends.

Sew on two buttons on the opposite sides of where you crested the buttonholes.


Tuesday, October 8, 2013

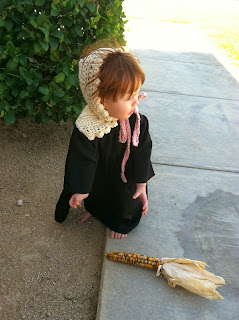
Vintage Inspired Pixie Bonnet


           Vintage Inspired Pixie Bonnet


Design By Kayla Anderson 


Size 12-18 months

 
Materials:

Worsted weight yarn
I/9-5.50MM hook
Ribbon if not making the drawstring out of yarn. (35-40 inches)
Darning needle
measuring tape
scissors


Bonnet:
Ch 61

Sc in 2nd ch from hook and back across.

*Ch2 turn, dc in front loops only across
Ch1 turn, sc in back loops only across*
Continue * to * until piece measures about 5.5 inches.

(If you want the bonnet to fit further forward on the head continue for a few more inches.)

(This is the ridge side.)

(This is the smooth side.)


Ch1 turn *sc,2 dc,sc in next stitch, sl st in next stitch*.
Repeat * to * across.

(This will create the decorative edge.)


Do not turn, Sc along side to create a more even edge. 

Fold piece in half joining corners and sc the piece together.
Ch1 sc back across.


When you get to the end of that row continue your next sc to the edge of the other side that does not yet have an even edge. 

Sc across to end.

Finish off.

Ribbon:
Ch 120

Sc back across. 

Finish off.
(Ribbon)

Weave through ridges of bonnet about 4-5 inches from bottom.
(Weave ribbon through ridges.)


Saturday, July 13, 2013

Chandelier Makeover


I have always wanted a chandelier. I think they are a fun and gorgeous way to light a room. I have personally never had one before. My house, growing up, was never the type of house to have fancy things. We had nice things, mostly hand-me-downs and inexpensive yard sale finds(my favorite), but never anything shiny and bright. I love the way my parent's house looks. It is rustic, country, comfy and cozy. It is filled with all of their favorite things which makes it perfect for them. I love the simplicity of it so I have decided to go for the same look in my home. I don't think I ever consciously made that decision, I just started filling my house with the things I love and it has just evolved into the same type of space. It's also very comforting creating a sanctuary like this that reminds me so much of my life growing up since I rarely get to see my family. I feel closer to home being surrounded by these things. I know money doesn't buy happiness, and I am a firm, firm believer in that, but these materialistic things really do make me extremely happy! One of the huge reasons I love my things so much is because more and more of them are things that I have made or redone to be exactly the way I want them.

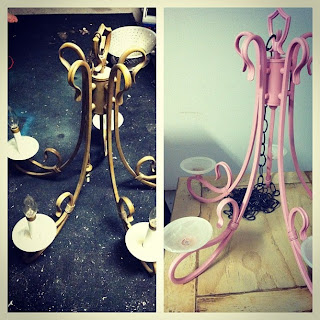
This Chandelier is one of those special projects. I was lucky enough to get the chandelier for FREE! It was brass and had electrical hook ups. The wiring was questionable, and we rent our home so hooking up a chandelier to the ceiling light was more work than we wanted to deal with so we converted it to a candle chandelier. I definitely prefer this look to the lightbulbs.

My husband first removed all wiring and bulbs. I started by washing and spray painting it pink. I actually had a lot of spray cans of light pink that I was going to use for another project that I never started. I was honestly very hesitant to paint it pink. I had other ideas...light yellow or green, or even trying a different metallic color. I only chose the pink because those cans were staring me in the face and I had to try it. (If you don't like it, you can always repaint it!) To my surprise I fell in love with the color and it works for my kitchen perfectly. After the paint dried I placed the glass pieces back on and glued them with hot glue. I also filled in any hollow areas inside the glass with the hot glue. This created a foundation for the tea light candles. We purchased a decorative chain from Lowes for about $5. The total for the project came to a total of $10 once I purchased the candles because I already had the paint.


The chandelier creates a nice focal point in my dining area. I never really enjoyed being in my kitchen before. It has a tile countertop that I hate. You would be amazed at how much I dislike my kitchen just because of that tile. Now I love it! 

I may not have a shiny sparkling home full of jewels, crystal, and gold, but I love my country accents. Now I have a beautiful chandelier that works perfectly with my rustic decor.

(Overhead view)


(the awful, awful tile countertop-and note the rose artwork 
on the far wall. The pink in the drawings are brought out with the pink chandelier.)
(another view)


Besides the pink chandelier I also have a few other DIY pieces in my dining area. The large farmhouse table was made by my husband and dad. I kept pinning many different farmhouse table tutorials on pinterest in hopes that one day someone would make me one. My dad was visiting last month (June) and I showed him a picture on my computer and told him he could make me one for his father's day gift "if he wanted to"(with a huge grin on my face). My sweet dad spent all of father's day making me this table. I am the luckiest girl on earth!


This photo shows the brilliant color and structure of it better than the other photos. I plan to take some more photos in the morning in the natural sunlight to show off the whole kitchen together.

Along with the table we found 6 folding metal chairs and painted them. I love that they are a totally different material than the table. We were able to find three folding chairs at the Salvation Army for $2 each. The other three we purchased for $10 each brand new. After buying paint the chairs cost less than $50. 

My kitchen is finally becoming a place I love. Now it's time to tackle the living room!

Happy DIYing!


After two months

I have been working really hard on getting in better shape and health. I did so well every day without fail for about two months. I was so proud of my progress. I felt so much better. I lost about 6 inches off my waist and was down at least 15 lbs. Since then my parents visited and I have not been doing so well. I don't want to blame it on them, I just got into the "vacation" mode and have fallen off the health train hard! :( I am working on getting things going in the right direction, but it has been difficult. I gained a little weight back and don't feel as good because I allowed myself to have pop. That stuff is evil! There is nothing good about it! I am slowly getting off of it so I don't have horrible caffeine headaches. I did well doing that last time so I hope that it works this time.

I know right now I may not be the best person to give fitness or health advice, but I will tell you what I know and did because it did work for me and I plan to get right back to where I was before.

I started out in small steps. I didn't do it all at once because that just gets too overwhelming. With small steps I eventually began eating clean, I cut out pop altogether (I actually just drank water-no lemonade, sugary tea-nothing!), and I worked out daily (taking sundays off for rest).

This routine became so addictive! It was so fun to see how my health improved and body changed for the better.

I went from not being able to walk this past March to jogging while out on a family walk. It was AMAZING! I also didn't have any more stomach pains and my pre-diabetes improved greatly. I used to be the type to gain and gain and never notice until I tried to fit into a pair of pants that fit me a couple laundry cycles ago! Now I have surprising results when it comes to trying on clothes. I love the shock of clothes being loose than them being tight or worse-so tight they don't fasten! Yuck!

So all it takes is a little-no a lot of hard work! It is so worth it though!

Here is a picture of me that shows the progress I did make in those short two months. The left is back at the end of March and the one on the right is the beginning of June(a little over two months). I see an incredible difference. I can't wait to see what results I will get next!


This is a quote that always keeps me going when I have set backs. It speaks the truth when you feel like you are making no progress towards your goals.

Good luck on your health journey!


Thursday, July 4, 2013

Rhubarb Plum Cream Cheese Pie


This recipe was created by tweaking a few things from one of my favorite recipes. I have had the recipe for years. I got it online probably 6 or 7 years ago and I can not find it anywhere. If you know who is to credit for this lovely recipe please do tell! Here is a link to the other post with that recipe.

I will go ahead and type it out again to keep you from clicking around. 
I will also include my version of this pie to incorporate the plums. A good friend of mine, who is also a military spouse, is lucky enough to live close to her parents. Her father has a plum tree and she gave me a huge basket full of delicious fresh (no pesticide) plums! I couldn't resist using them in some way in this recipe. Their color is beautiful and I just knew the taste would do very well with the cream cheese.

Here is the original recipe:


Rhubarb Cream Cheese Pie

3 cups rhubarb or 1 pkg. (chopped)
1/2 cup sugar
unbaked pie shell
2 eggs
8 oz. cream cheese
1/2 cup sugar

In a bowl combine rhubarb and 1/2 cup sugar. Fill pie shell with mixture and bake at 425 degrees for 15 minutes. Remove pie and readjust oven to 350 degrees. In a separate bowl, combine 2 eggs, 1 pkg. cream cheese and 1/2 cup sugar. Pour over rhubarb mixture and bake at 350 degrees for 30 minutes.

Topping:
1 cup sour cream
1 teaspoon vanilla
1/2 cup sugar

To make topping mix all ingredients together and pour over hot pie. Spread to edges of pie crust without dripping over. Refrigerate for at least 1 hour.


Rhubarb Plum Cream Cheese Pie

1 cup rhubarb (chopped)
2 cups plums (pitted and sliced-keep the peels on)
2 Tablespoons minute tapioca 
1/2 cup sugar
unbaked pie shell
2 eggs
8 oz. cream cheese
1/2 cup sugar

In a bowl combine rhubarb, plums, tapioca and 1/2 cup sugar mixture. Fill pie shell with mixture and bake at 425 degrees for 15 minutes. Remove pie and readjust oven to 350 degrees. In a separate bowl, combine 2 eggs, 1 pkg. cream cheese and 1/2 cup sugar. Pour over rhubarb mixture and bake at 350 degrees for 30 minutes.

Topping:
1 cup sour cream
1 teaspoon vanilla
1/2 cup sugar

To make topping mix all ingredients together and pour over hot pie. Spread to edges of pie crust without dripping over. Refrigerate for at least 1 hour.

I would refrigerate even longer. After one hour it is chilled and delicious, but I find that 3+ hours is even better.

(adding fruit and sugar mixtures to pie shells)

(pouring egg mixture over fruit)

(Sour cream topping added)

(this is the plum version after being chilled)

DELICIOUS!!


Tuesday, June 25, 2013

Chair Planter re-do

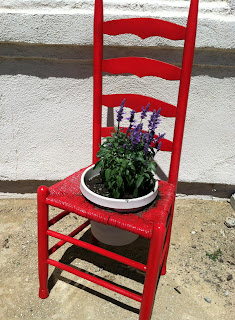
Last year around this time I took an old half wooden, half wicker chair and turned it into a planter for my front porch. I loved the look of it and I liked the white color well enough, but I don't like how it blended too much with the light colored exterior of the house. I painted it a bright red and love the result. I planted some purple flowers, which I don't know the name of, to give it a little contrast. I wish I knew the name of the flowers...I lost the tag and I bought so many flowers that day I can't remember now. If you know by looking, please comment! 
OLD PLANTER

NEW PLANTER

Wednesday, April 17, 2013

Knitting!

I have been crocheting for awhile, as you can probably tell. I know a lot about it and have even gone as far as attempting to write my own patterns. I love crochet. I would go as far as saying I love knitting even more! It holds a dear place in my heart because my grandma taught me how to do it when I was little. I think I was about 8 years old. I caught on quick. I learned the basics, and now I want to expand on them. I have tried a few patterns and FAILED horribly. My last failure was at a bad time. I was pregnant, more hormonal that normal, and was trying to make my daughter a dress that she could treasure forever and pass down to her children...this was a recipe for disaster. When I failed for the last time there I switched gears and started crocheting. I was able to push myself further with crochet then I had with knitting. Now I am ready to focus on knitting again, so this is where I am now.

I am attempting to make a sweater. It is very ambitious for my skill level, but I know it is what I need to push myself further. I am making the slouchy sweater from the Knit Cafe pattern book.
I am making it in the fisherman's wool in a brown color. I think it will turn out very nice. I am plus size and they do not have sizing that large, but I am making it in a large. I figure by the time I finish making it I will be that size, haha! I will have photo updates on my progress later. Until then...

Happy Knitting!

Sunday, April 7, 2013

Brussel Sprout Flax Seed Turkey Burgers

Part of my weight loss journey has been experimenting with new foods as I try to eat cleaner and healthier. A big part of my diet has been eliminating nightshade foods (tomatoes, potatoes, eggplant, peppers, etc.) because of my arthritis. This means no ketchup, chile sauce or powder, french fries or anything hidden. I've recently learned the hard way, if it says "spices" in the ingredient I should not consume it. This unfortunately leaves me with fewer options when it comes to meal planning. After experimenting with different recipes and researching the benefits of different foods, this combination is what I came up with for our dinner tonight. I wanted to serve my family something that was healthy, but also somewhat resembles "real" food. After all, they are nice enough to eat my dinners. Breakfast and lunch are on their terms. :)

Brussel Sprout flax seed Turkey Burgers

Makes 4-8 patties

ingredients:
1 lb. ground turkey
3-4 fresh brussel sprouts
1 Tbsp. flax seeds
1 egg
non-stick cooking spray
garlic, black pepper or your spice of preference 
(I just used garlic and black pepper due to my nightshade allergy)

Chop brussel sprout into very small fine pieces.

Mix with flax seeds.
Mix in turkey meat and stirred egg. Make 4-8 patties.
Spray large skillet with non-stick cooking spray. 
Place burgers in and season to your liking. Cook 
burgers evenly, flipping throughout.

You can eat them like a typical burger, on a bun and add whatever condiments you like. 
Because of my allergies and low carb lifestyle I chose to eat mine as is. It was just as delicious!
Brussel sprout flax seed turkey burger with a side of broccoli and Havarti cheese.


Wednesday, April 3, 2013

Weight loss journey starts NOW!

After many many years of being overweight, I am ready to make a huge change. To be honest I have started and stopped this process many times.

In the beginning I wasn't motivated enough and I kept putting on the weight. Eventually my arthritis (psoriatic) got so bad that I needed to make a change or I couldn't walk or even breath sometimes. :(

I tried many times to exercise and it just hurt me so bad I couldn't walk the next day.  It was hard to overcome and I felt defeated. Those feelings didn't help my diet. I felt if I couldn't exercise, "what what the point?" I then put on more and more weight.

Skip to now, after having my daughter and having pain so bad I can't sleep most nights, walk or even sneeze without crying...I have had enough!

With the help of my awesome doctor and a new medication (new to me) I am finding some relief!! I've been on it a couple months and I am feeling some great results from it. The pain never fully went away, but how can it when I weigh this much and still have a horrible diet with no movement in my life?

So I researched and researched...I read that eating clean (duh!) helps...and not only that, for me specifically, but I could also incorporate an elimination diet of certain foods that contribute to inflammation and pain with arthritis. I have eliminated night shade foods and red meats thus far. It has been about a week and I FEEL INCREDIBLE! Omgosh! I wish I knew this when I was 10, my life could have been completely different.

With the help of my new nutrition and medication I am now able to EXERCISE! I have been incorporating yoga, walking and zumba on my wii. I love it and I have never felt better.

At my heaviest right after having my daughter I weighed in at 256#. That is a devastating number to me and I never want to see it again :(

This picture is plain awful! Turning point photo! lol 246#

I have worked hard these last couple weeks - starting at 246# two weeks ago-I am now down to 240#.


Slow and steady. I know if I keep at it I will reach my goal and get my life back. I have felt trapped in this painful body for too long. I am so ready to change.

Like I said before. I have started this journey many many times and quit too many times. What is different this time? I hope a lot is different. I am afraid of quitting. I am terrified to do this because I think I will just fail again.

I am trying to be smarter about things this time. I am more educated. I feel better.

One of the biggest things is I am trying to surround myself with positive thoughts from friends and family. I also just get on google (or bing) lol every once in awhile and search (weight loss motivational quotes). There is some good stuff on there! I recently made a poster with weight breakdown and pictures of myself, now and back when I was smaller, as motivation.
I think looking at this everyday and marking off each pound will give me great motivation to keep going on those days it gets too tough.

Until next time...good luck with your journey!

Sunday, March 3, 2013

Barefoot Sandals

I made these adorable barefoot sandals for my daughter last night. They are so cute! And they actually stay on her little feet. There are a little big for her. I made the 6--18 month size and she is only 9 months old so they are a little on the big size. They still look nice, and of course, super cute!!!!!!!!


This is where I got the pattern. I hope you enjoy it as much as I do!


Happy Crocheting!


Thursday, February 21, 2013

Handmade cutie contest

Hook, Line and Sinker is having a contest on facebook. It's the "Handmade cutie contest." I entered my daughter into the contest and would love for her to win a new hat! The photo with the most likes wins! She is not in first and we need to get her there...so if you click here and "like" the picture you can vote for her. Also if you like Hook, line and sinker's stuff go ahead and like her page. Thanks for showing your support!


Now how can you NOT vote for that face??!!? :)

Wednesday, February 20, 2013

Mary Kay Makeover

This morning my friend and Mary Kay consultant hosted a little get together to do facials. She is in a race with herself to do as many facials as she can. If she does enough she just may win some money for her favorite local charities. I was happy to lend my face.

We had some muffins. We had some juice...it was a pretty good morning. :)


...on to the make-up! I have to start by saying I have tried many different products and Mary Kay always seems to work out best for me. I've tried their lip, face and hand products mostly and have been nothing less than satisfied with them.

With all my crocheting I have terrible dry hands. Their satin hands is AMAZING!
Satin lips is pretty amazing too. :)

I have very fair skin, and I'll admit I do not take care of my skin like I should. I was glad to go today to get a kick in the right direction. My face/cheeks mostly, are always very red. I wouldn't consider it rosacea, but they are definitely rosy! 
The lighting isn't the greatest for this picture, but my face usually is this red! lol


I was so pleased with the foundation she chose for me. You can hardly tell I have anything on my face and the redness was subdued. I love it!


The lipstick was a big change. I NEVER wear lipstick. I can never find the right shade. I am too cheap to buy different kinds to trial and error. This is why I love Mary Kay. I can try everything!

This lipstick is called "Maple."
 I think it has more of a pink tint on my lips. 
(I have pink undertones everywhere!)
 Every shade is different on everyone so I suggest trying them all! 
It's more fun that way ;p

I can't remember what all was on my eyes, but if you like this shade of lipstick here is the link to the website.
And here is my friend's business page on Facebook. She is extremely motivated, an EXCELLENT consultant. :)

Monday, February 18, 2013

Dinosaur Costume Photography Prop


Dinosaur Costume Photography Prop


Original Design
By:
Kayla Anderson


Size:
Infant
(Hat can be made in other sizes)


Supplies:
Size J crochet hook for body
Size G crochet hook for spikes
Worsted weight yarn in two colors
Darning needle
Poly-fil

Gauge:
5 hdc=2 inches
4 rows=2 inches

Crochet techniques used:
Magic ring=wrap yarn around finger two times, 
insert hook through loop, yarn over hook, pull through loop.
Ch=chain
Sc=single crochet
Hdc=half double crochet
Hdc2tog=half double crochet 2 together
Sl st-slip stitch


Starting at hat:

Make a magic ring.
Hdc 6 times in ring.
2hdc in next 6 st = 12 stitches.
(2hdc, 1hdc)* 6 times=18 stitches.
(2hdc, 1hdc, 1hdc)* 6 times=24 stitches.
(2hdc, 1hdc, 1hdc, 1hdc)* 6 times=30 stitches.
(2hdc, 1hdc, 1hdc, 1hdc, 1hdc)* 6 times= 36 stitches.
(2hdc, 1hdc, 1hdc, 1hdc, 1hdc, 1hdc)* 6 times= 42 stitches.
Hdc 4 rows.


Continuing to back and tail: 

Sc 3 times, turn ch 2.

Hdc 11 times.

Turn, ch 2, hdc across.
Turn, ch2, hdc across.
Turn, ch 2, 2hdc , hdc across, 2hdc in last stitch.
Turn, ch 2, 2hdc, hdc across, 2hdc in last stitch.
Turn, ch 2, 2hdc, hdc 6, 2hdc, hdc 6, 2hdc in last stitch.
Turn ch 2, hdc across.
Repeat for 6 more rows.

Turn, ch 2, hdc2tog, hdc 6, hdc2tog, hdc 6, hdc2tog.
Turn, ch 2, hdc2tog, hdc 5, hdc2tog, hdc 4, hdc2tog.
Turn, ch 2, hdc2tog, hdc 3, hdc2tog, hdc 3, hdc2tog.
Turn, ch 2, hdc across.
Repeat for 2 more rows.

Turn, ch2, 2hdc, hdc 3, 2hdc, hdc 3, 2hdc.
Turn, ch 2, 2hdc, hdc 4, 2hdc, hdc 5, 2hdc.
Turn, ch 2, hdc across.
Turn, ch 2, hdc2tog, hdc4, hdc2tog, hdc5, hdc2tog.
Turn, ch 2, hdc2tog, hdc 3, hdc2tog, hdc 3, hdc2tog.
Turn, ch 2, hdc2tog, hdc 2, hdc2tog, hdc1, hdc2tog.
Turn, ch 2, hdc across.
Repeat.

Turn, ch 2, 2hdc, hdc 1, 2hdc, hdc 2, 2hdc.
Turn, ch 2, 2hdc, hdc 3, 2hdc, hdc 3, 2hdc.
Turn, ch 2 hdc across.
Turn, ch 2, hdc2tog, hdc 3, hdc2tog, hdc 3, hdc2tog.
Turn, ch 2, hdc2tog, hdc 2, hdc2tog, hdc 1, hdc2tog.
Turn, ch 2, hdc2tog, hdc2tog, hdc2tog.
Turn, ch 2, hdc across.
Turn, ch 2, 2hdc, 2hdc, 2hdc.
Turn, ch 2, 2hdc, hdc 2, 2hdc, hdc 1, 2hdc.
Turn, ch 2, hdc across.
Turn, ch 2, hdc2tog, hdc 1, hdc2tog, hdc 2, hdc2tog.
Turn, ch 2, hdc2tog, hdc 2, hdc2tog.
Turn, ch 2, hdc across.
Repeat.

Turn, ch 2, hdc2tog, hdc2tog.
Turn, ch 2, hdc2tog.
Sl st.

Sc all the way to hat, sl st around hat, sc down the rest of the back piece and down tail.
Once you get to the tip of the tail, instead of sc the last two stitches, ch 2, and dc 2 at the tip, sc, and sl st. Finish off and weave in ends.  The placement of these stitches should be placed so that the tail evenly comes to a point. 
Take the other color that you will use for the spikes and sc all around the hat, back, and tail.


Spikes:

Using G hook.


Largest Size:
ch 12, sc across
turn, ch 1, sc2tog.
Repeat until there is one stitch left.
Sl st. finish off weave in ends.

Makes another the same size.
Do not weave in ends yet. Sew together almost all the way around, right before you finish, stuff with poly-fil.

Makes one more this size.  

Total of 2 Large spikes

Medium size:
Ch 10, sc across
Turn, ch 1, sc2tog,
Repeat until there is one stitch left.
 Sl st. finish off weave in ends.


Do not weave in ends yet. Sew together almost all the way around, right before you finish, stuff with poly-fil.

Total of 3 medium spikes.


Smallest size:
ch 8, sc across
turn, ch 1, sc2tog,
repeat until there is one stitch left.
 sl st. finish off weave in ends.

make another one this size.

Sew two pieces together all around until you are almost to the end, and stuff with polyfil, finish sewing.

Total of 2 small spikes.

Sew pieces on like shown in the pictures.

I find the easiest way to sew them on is to place it where you 
want and then wrap the body around the spike and sew from 
the inside. It tucks it in place and stay more secure. It doesn’t 
move around as easily when you are trying to sew it in place.


Thank you for taking the time to support my blog. 
I hope you enjoy this free pattern.

Please do not distribute this pattern as your own. 
You may link to this pattern. You may sell finished products from this pattern. 
Giving design credits from your finished pieces would be awesome, but not necessary.