Visitors

Friday, August 31, 2012

~Salt & Pepper SHAKERS~

I found these awesome old school lookin' salt and pepper shakers today at the BX. I love owls. At first I wanted everything owl for my daughter, but now I am loving them for myself. :) They are just too darn cute. 

These shakers in particular remind me of my great grandma. She had a TON of salt and pepper shakers. All very unique, not one set was the same. I always enjoyed gawking at all of them. After buying these today I want to find more. Maybe I'll become a collector just like her! I have some extra space in my oak china cabinet. :)

My NEW 'Do!!

I have not had my hair done in almost two years until the other night. My mom usually cuts and colors my hair, but since I have moved away she obviously has not been able to do it and I have neglected it in fear of not trusting anyone else to do it. I didn't want to pay the money for it either...Yep, I'm cheap. Never said I wasn't ;p Anyway, after a long pregnancy of not wanting to color my hair, I had my baby and now it is time. I wanted something fun and crazy-blonde would have been awesome, but I am too scared to take that plunge. I opted for blonde highlights on my dark brown hair instead. I LOVE how it turned out! I also had it cut. Something to give volume, because as you can see from the "before" picture, my hair was pretty lifeless. :( 

And so...the BEFORE!!

Yuck, I know...but my baby is adorable. I'm awesome at multitasking ;p

Here is the awesome AFTER...


I even love it pulled back. My hair is not plain and flat anymore, there is style to it now.


Saturday, August 25, 2012

My signature cakes...oh so good!

These are the sour cream cakes. 
It all started when my mom found a recipe for an orange peach sour cream cake.

All it is...you mix:

One box of orange cake mix
1 cup of sour cream
2 eggs

Mix together then fold in a can of peach pie filling. 
Add this last so you do not puree the fruit pieces.

Bake at 350-375 degrees for 35-40 minutes. 
Check often in case your oven temperatures are different.
Cake will be moist and fluffy with yummy fruit pieces within it.

The nice thing about this recipe is you can use any cake mix with any type of pie filling you want. The possibilities are endless!!!!!! Whatever you choose it will end up moist and delicious.


This cake I made for a friend. I added cream cheese icing on top. (Colored turquoise) lol
This type of cake is not the greatest for decorating-just eating. As you can see it tends to collapse from the weight of icing. Still delicious!


Another thing to try is chocolate cake with cherry pie filling. It's kind of like a chocolate covered cherry, only better cause it's cake!


If I have fruit to add to the top that always makes it better.

One that I made while I was pregnant was Strawberry cake with cherry pie filling.
I had crazy sweet cravings the whole nine months, and I had a girl! 
I wanted to make it fun so I made it purple ;p


The cake that I have tried most recently was a strawberry cake with strawberry pie filling...OMG! It has  got to be one of my favorites so far. I made it for a family gathering when I flew back home to indiana for a visit. It was gone in no time! 

Go ahead and give it a try! Let me know how yours turn out. :)


Wednesday, August 22, 2012

My baby is 3 months old!!


My little baby turned 3 months old about 5 days ago and I am just now getting around to taking her pictures. With the older two starting school, we have had a hard time getting into a schedule that doesn't leave her cranky. We did finally snap a few good ones! Here is my little girl.


Cute little smirk!!


My aunt knitted this beautiful peach dress and I found the headband and cute ballet shoes to match. I just love the color scheme. So sweet...!


LITTLE SHOES!

Tuesday, August 21, 2012

Moving

We were just notified about a week ago that we got a house! We can finally move into a larger house! I have been packing, organizing, getting rid of stuff, and cleaning. I am so tired and I have so much more to do.  Most of my crafts and supplies have been packed away (and we don't even get the house until oct)..so my time and energy will have to be focused on fun/clever ways to make this old house perfect and brand new.

The latest cleaning technique I tried was cleaning my top loading washing machine.  The instructions are fill with hot water and add a quart of bleach-that much kinda scared me so i used what i had left in the bottle. Turns out it was about a cup. Let it sit for an hour then finish the cycle. Then do the same thing with a quart of vinegar. Again I only used about a cup even though it is much safer than bleach. My only complaint is I really wanted some salt and vinegar chips after that, haha. Before you finish the cycle with the vinegar check out that water! NASTY! Hard to believe something that washes something else could be so gross and unclean. Well now my washer is so pretty and shiny clean :)

Too bad I forgot to take pictures. Maybe next time.


Next project: Denim travel roads for C's hot wheels. I WILL take pictures for that post :) Night everyone...

Tuesday, August 14, 2012

Crock Pot Freezer Meals

I am exhausted! I made a trip to the grocery store today with three kids and a list of things I needed to get to feed us for three weeks. I was very ambitious...We no longer walked in the door and we get a call from the housing office that they had a house for us! This was a welcome interruption. We leave and go check out the house, sign for it and head back to the grocery. I get the baby in her wrap all tucked in to me and she start screaming her head off right in front of the berry section. I fumble around in her diaper bag for a bottle...realizing I packed everything EXCEPT a water bottle. I manage to make a bottle using tap water (yuck) and feed her in the wrap---onward we go piling things in the cart. I was on a roll, but I guess not quick enough because the older two started getting antsy and acting up and whining. I could not concentrate. By this time my husband was getting off work. I called and begged him to come help me...I was in way over my head... He came to our rescue and we were out of the store in a half an hour...

$212.78 later I had a car full of groceries to feed my wonderful family for almost a month! That's a record for me. I used to easily pay double that for just 1-2 weeks of groceries.

TIP: MAKE A LIST!

-Make a list of meals
-then make a list of ingredients you need for each
-add on to the list other things you may need for snacks, lunches, etc.
-I even go so far as writing the approximate price next to each item on the list-rounding up to the nearest dollar.
-Add up how much and you can get an idea of what you're spending so you know if you need to take off or if you have it in your budget to add on.
-I always get a nice surprise at the register-Less than what I predicted I would spend.

TIP: If you're making meals;make enough for two or three of the same meal. You are buying all the ingredients and putting it all together anyway, might as well make more for later. It may be a few dollars more then, but worth it later. You're saving time and energy. It may not even be a few dollars more. You buy a sack of potatoes or onions because one recipe calls for some, why not double or triple the recipe. You get more meals out of the food you were already purchasing.

I freeze the extra dinners. Or all of them if I have bought so far in advance that the food would go bad if I didn't freeze them.

TIP: Freeze the same dinner in multiple bags. Just because the recipe calls for 4 chicken breasts does not mean you have to make all 4 at the same time. Just freeze into smaller portions. Unless you like leftovers. Our family does not eat leftovers.

flatten your frozen dinners to freeze. Once they are frozen you can stack them the way they are frozen or stand them up on their side, whichever if more space efficient for your freezer. Mine will probably stay this way.


So far I am liking this new system. It is very tiring, but it will save me time later that I can spend with my family in the evenings.


Like mother~Like daughter

My beautiful baby girl looks JUST like her daddy. I see myself in her at certain times. The older she gets she starts looking more and more like me. I was looking at her sleeping in her crib the other night and thought she looked just like I did in an old photo of me that I had in my scrapbook. I snapped a photo of it and put them side by side...
I am the baby on the bottom; my daughter in on top at around 3 months old. 

We also share one feature that can not be denied...our hair!
It defies gravity :)

I am on the left and she is on the right...her hair is longer than mine at that age, but it all sticks straight out in all directions, lol


Sunday, August 12, 2012

Teriyaki Chicken

There is an awesome Chinese restaurant in the next town that serves teriyaki chicken that is so delicious. I have never made it at home so I thought I would try since it is a family favorite. Eating out is far too expensive to do all the time. :( After some pinteresting (Is that even a word???) I found a keeper.  It is simply called, "Crock Pot Teriyaki Chicken."

Just so I don't have to type it all out, here is a link to the website that I got it from.


Here is how mine turned out...


It is so easy and so TASTY, and there is plenty for leftovers :)

Reused Always Infinity Pads boxes

I accidentally bought 4 different boxes of pads thinking I had not bought any-can you imagine where my mind must have been-haha  Anyway, I had a few extra boxes that I had not already thrown in the recycle bin that I thought were the perfect size to hold my baby girls lotions and body washes. 

They were the perfect height and width. I did not care for the big "Always" logo on the front so I covered them in plain, heavy scrapbook paper. They are fine for now, but I am still thinking of what I can add to give them a little more character. Maybe rhinestones, lol. 

You could cover just about any box with even more interesting scrapbook paper, but I thought the infinity boxes were very sturdy-and like I said, just the right size :)
There is even a tiny little oval window in the box that you could cut out with an exacto knife if you choose to go all out ;P


Wrapping for Little ones

I know this idea is not very eco-friendly, but you can always reuse the tissue paper like I know you're gonna do anyway. 
Either way it is a ton of fun for the little ones to unwrap. Just take a ton of tissue paper and gather the tissue paper at the center of each sheet and stick to the outside of a package. I went ahead and wrapped it in wrapping paper first so it was all covered in case you could see through some of the tissue. You can use double sided tape or you can fold a piece of tissue paper in half and tape across it to the package instead. That's what I did with this one. If you use enough you can't tell. 

You could also use this technique to cover other things. Maybe a storage container in a little girls room to give it a ruffled look...??


Gathered t-shirt

This is another project from pinterest.

My wolverine t-shirt ---> gathered tank top


My husband gave me an awesome Wolverine t-shirt that I LOVED but was literally down to my knees. I figured this would be the perfect shirt to use for the altered tshirt tutorial. 

It is yet again anther simple project.

First you cut the sleeves off just inside the seam. Then cut the top of the shirt off right under the neckline-straight across. you now have a square/rectangular shape, no curves! 
Now you need to make the little tunnels for the neck piece. Fold the top of one side of the tshirt to the inside about an inch. Do the same to the back. 
To make the rope that makes the neck of the shirt you cute the hemmed line from the sleeves you already cut off. Cut them once so you have two pieces and sew those pieces together at one spot. Feed the rope through the "tunnels" of the tshirt then sew the rope together. Shimmy the rope around until the sewn parts are hidden inside the shirt. Your shirt is finished! :)

Sorry if my instructions are hard to follow; I always forget to take pictures as I go. If you are having issues you can always search on pinterest for a similar tutorial.

Saturday, August 11, 2012

Mexican/Italian-what you get when you have random things in your pantry

I like to call this "Nacho average baked spaghetti"

Yes, I know...I'm so clever. It was actually QUITE TASTY. My dad ate it and that is saying something.


It's super simple. Fry your hamburger, use taco seasoning, mix in a little refried beans, jalapeno peppers, corn (from a can is good)heat that all a little in same pan...cook ya some sketti at the same time. drain and mix with meat mi
xture. put in baking dish. top with tomatoes, shredded cheese and crushed tortilla chips...bake about 10 min on 350-450 (really doesnt matter.lol) top with taco sauce and sour cream if you like and voila! "nacho average baked sketti"! ENJOY!

Bandana Dress from Pinterest

I saw it pinned over and over again and then I pinned it and it sat in my "For the GIRLS" board forever until I finally decided to attempt it. It sounded so easy, and I'm sure it was for most people. NOTHING is ever simple for me.  I dusted off the old sewing machine my grandmother gave me. This is the first time I have used a sewing machine aside from the time I made an UGLY pillow in home economics class in 7th grade. I got a C. Needless to say it has affected my ambition trying to sew for many years. The other thing was my brother got an A+ on the same assignment the year before I had the class. I had a lot to live up to and I didn't do a very good job, haha. But, my creative/crafty hobbies has steered me back in this direction with a SIMPLE project...again, HAHA.

For those that have not seen the Bandana Dress on Pinterest, here are the simple instructions.


Bandana Dress/Shirt
This is a dress for sizes 2T/3T and a shirt for any larger. (It is a very large long shirt for my daughter-5T)

You will need:
Sewing machine
thread
at least 80 in total of ribbon (I used 1 1/2 in width ribbon)
and 2 bandanas 
 The last two are where the fun comes in! I used a camo and green bandana pattern with orange ribbon. My next project is a batman bandana with black and white zebra and a bright yellow ribbon. Oh the possibilities!!

Put the two bandanas right side facing one another. measure the width of your ribbon and add 6 in. to that. Measure down that length, start sewing from this point down to the bottom. (Your top should have the writing on it so it will eventually be hidden when sewn-mine said something about 100% cotton, blah blah blah). Sew the same thing on the opposite side. You will now sew the top of the dress where you will feed the ribbon through. Measure down the width of the ribbon and fold outward so that the seam will be on the inside of the dress and then sew this piece to  itself across to the other side. Sew the other side of the dress. Once all the sewing is complete you take one 40 in. ribbon and feed it through one of the tunnels you sewed. Do the same to the other side and tie the ribbon to the other making cute bows. And you're finished! It was as simple as it says. It also said it would take 15 minutes. It took me like 40 because I sewed too much and had to rip it out. It still ended up adorable, but I have an adorable model so that helps. 

It's time for Rhubarb!

     Oh how I love rhubarb! Every place I lived as a child always had rhubarb growing somewhere. My grandpa always had rhubarb growing at his house too. Needless to say we had a ton. My favorite pie was strawberry rhubarb, because the strawberry always made the rhubarb less tart and much more tolerable as a kid. Now that I am an adult with a "sophisticated" palate (haha) I can appreciate its tartness. I greatly appreciate, but now it's time for experimenting and that always works best with SUGAR!
     

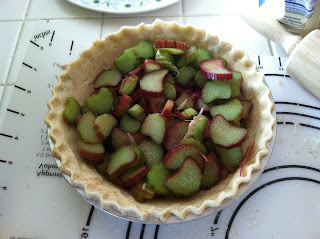
     One of my favorite recipes that I have made the last couple years is a Rhubarb Cream Cheese Pie. Rhubarb=YUM! Cream Cheese=DOUBLE YUM! How can you go wrong with this one???


Rhubarb Cream Cheese Pie


Filling:

3 cups or 1 package of rhubarb
1/2 cup sugar
unbaked pie shell (I have tried graham cracker crust-not as good in my opinion-my favorite it to make my own crust from a box-scratch would also be yummy, of course)
2 eggs
8 oz. pkg. cream cheese
another 1/2 cup sugar


Topping:
(Note the little finger marks)

1 cup sour cream
1 tsp. vanilla
1/2 cup sugar

Fill pie shell with 1/2 cup sugar mixed with diced rhubarb. Bake at 425 degrees for 15 minutes. Remove pie and readjust oven temperature to 350 degrees. In a separate bowl, combine eggs, cream cheese, and 1/2 cup sugar. Add to rhubarb mixture and bake at 350 degrees for 30 minutes. Mix ingredients for topping and add to pie when it comes out of the oven. Be careful...mine ALWAYS runs over. Place on a plate, foil, baking sheet, etc to keep your oven and fridge clean. Refrigerate. You can eat at any time, but refrigerating over night will keep the pie from turning to goop when you cut it. Mine is always goopy cause I can never wait. It's yummy either way! :)

That last picture is the only one I have currently. I made the mistake of taking the picture the next morning after I have let it cool over night in the fridge and my sneaky 5 year old got to it before me! I have to thank her though. It was going to my husband's office. Instead we had to keep the little finger pie for ourselves!!! Kids are hilarious :D


Now here is another recipe for Rhubarb I thought I would include since a friend was needing to cook up an abundance of it. I have not tried this yet, but it sounds good. I LOVE rhubarb so I have a feeling it will be as good as it sounds.


Rhubarb Crisp

3 cups rhubarb
1 cup sugar
3 T flour

Mix altogether-pour into 8x8 greased pan.

Combine
1 cup brown sugar
1 cup rolled oats
1 1/2 cups flour
1/4 cup margarine or shortening

Sprinkle over rhubarb mixture. Use 9x13 pan if recipe is doubled. Bake at 375 degrees for 40 minutes.

Wednesday, August 1, 2012

I'm Back!

Well I'm back from my trip home to Indiana. It was a very nice trip. It definitely rejuvenated me. I miss my family terribly, but it also showed me how much I miss my little stinkers at home.
     Today we went to town to run errands. We also stopped by target to get a few things. E and I hit up the clearance rack of little girls accessories and she found a cute pair of yellow sunglasses and an awesome green headband that I only wish would fit my head! :)

We went to a couple other stores and found C a transformer bat and ball. Once we got home the older two ran outside with their new stuff. If you can imagine her all decked out in this playing ball. Just my kinda girl! :)

One of the highlights of my trip home was the home grown food. I LOVE garden tomatoes and my dad had a ton! I love this picture I took of a few he just picked that day. You can see their old barn in the background through the window. One of my favorite pictures.


We also got some great pictures of A on the mini horse at my mom and dads. Those were taken on my other camera so as soon as I get them uploaded they will be posted. 

What a great week and a great day with my wonderful amazing family. I love them all so much.